
Introduction
In this article, I want to walk you through my experience of going "serverless" and building an API "microservice" using AWS Lambda and API Gateway. Think of it as a practical guide to help you navigate creating your own microservices with these tools.
This article will focus on running serverless on local machine.
Getting Started
I’m going to assume you have an AWS account and NodeJS installed. If not, handle that now.
Next you’ll need to install the Serverless npm package, which provides a way to easily create, edit, and deploy microservices as AWS Lambda functions:
npm install -g serverless
Next, simply follow Amazon's guidelines for setting up an IAM user and configuring Serverless to utilize those credentials.
Setting up project
You could run the following command to create a serverless folder to get the startup files:
serverless create --template [template-name] --path [service-name]
However I will create it from scratch. Create a new folder (e.g. nodejs-serverless) and run following command:
npm init
Replace the content of the file 'package.json' with the following content:
{
    "name": "nodejs-serverless",
    "version": "1.0.0",
    "devDependencies": {
        "@types/aws-lambda": "^8.10.101",
        "serverless": "^3.21.0",
        "serverless-offline": "^9.1.6",
        "serverless-plugin-typescript": "^2.1.2",
        "typescript": "^4.7.4"
    },
    "dependencies": {
        "simple-git": "^3.22.0"
    }
}
Here we are adding typescript types and serverless dependencies for our Node project
Creating the handler
Create new request 'handler.ts' file with following content:
import { APIGatewayProxyEvent, APIGatewayProxyResult } from "aws-lambda";

export const hello = async (event: APIGatewayProxyEvent): Promise<APIGatewayProxyResult> => {
  return {
    statusCode: 200,
    body: JSON.stringify(
      {
        message: "Method executed successfully",
        input: event,
      },
      null,
      2
    ),
  };
};
We just added a method which will be triggered by the API Gateway event. It return API Gateway result. To enable passing in an API Gateway event when invoking the handler, create a file 'mock.js' with following mock event data.
module.exports = {
  Records: [
    {
      message: "Hello me!",
      input: {
        path: "/hello",
        headers: {
          Accept:
            "text/html,application/xhtml+xml,application/xml;q=0.9,image/webp,*/*;q=0.8",
            "Accept-Encoding": "gzip, deflate, lzma, sdch, br",
        },
        body: "request-body",
        isBase64Encoded: false,
      },
    },
  ],
};
Configuring Serverless
Add serverless configuration file 'serverless.yml' with following content.
service: nodejs-serverless
frameworkVersion: '3'

provider:
name: aws
runtime: nodejs16.x

functions:
hello:
handler: handler.hello
events: - httpApi:
path: /
method: get

plugins:

- serverless-plugin-typescript
- serverless-offline
The 'functions' property lists all the functions in the service. You can see 'hello' is the only function currently in the 'handler.js' file. The 'handler' property points to the file and module containing the code you want to run in your function. By default this handler file is named 'handler.js'. It also define the event which will invoke the function. Plugins are used when compiling and running serverless. Rest of the entries are to define service name, version and provider.
Deploying to cloud
Now we’re ready to deploy! Simply run (ensure AWS is configured for Serverless):
serverless deploy
Running local using invoke
It's surprisingly easy to run Serverless offline. Just run the following command in your terminal:
serverless invoke local --function hello --path mock.js
This command invokes the 'hello' function handler with the mock API Gateway event data. The output of the handler is an API Gateway result, which will be printed on your terminal as follows:
{
  "message": "Your function executed successfully!",
  "input": {
    "Records": [
      {
        "message": "Hello me!",
        "input": {
          "path": "/hello",
          "headers": {
            "Accept": "text/html,application/xhtml+xml,application/xml;q=0.9,image/webp,*/*;q=0.8",
            "Accept-Encoding": "gzip, deflate, lzma, sdch, br"
          },
          "body": "",
          "isBase64Encoded": false
        }
      }
    ]
  }
}
Running local using serverless offline
Invoke the command from the terminal:
serverless offline start
This will start the server emulating AWS Lambda and API gateway on your local machine.
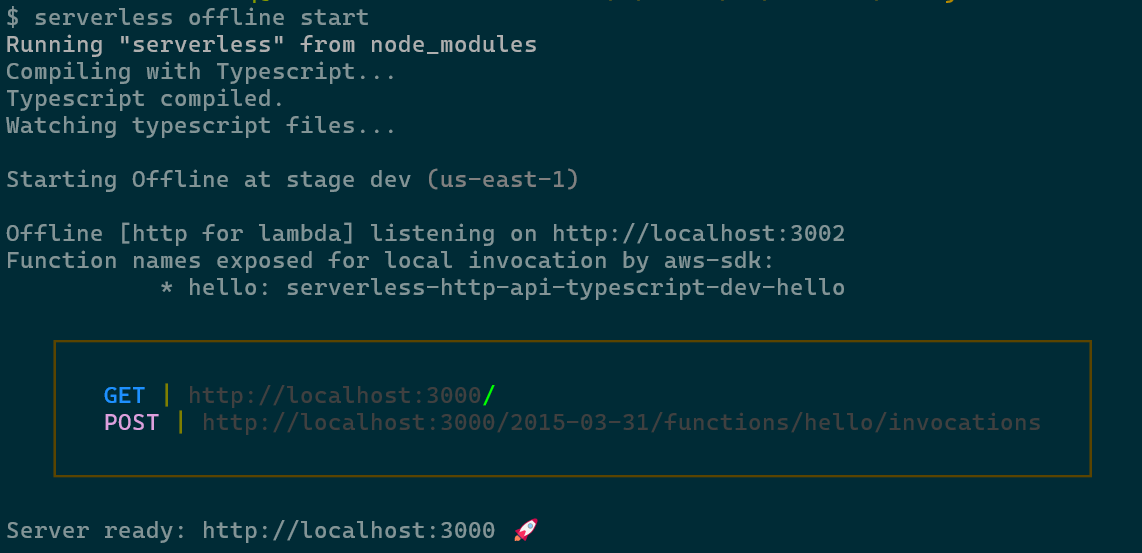
Get can be accessed on http://localhost:3000. You can invoke the function by curl:
curl --location 'http://localhost:3000/'
This will produce familiar but detailed response as below:
{
    "message": "Your function executed successfully!",
    "input": {
        "body": null,
        "cookies": [],
        "headers": {
            "user-agent": "curl/8.2.1"",
            "accept": "*/*",
            "cache-control": "no-cache",
            "postman-token": "d10bc8ad-595b-4850-951b-f4260ae205ed",
            "host": "localhost:3000",
            "accept-encoding": "gzip, deflate, br",
            "connection": "keep-alive"
        },
        "isBase64Encoded": false,
        "pathParameters": null,
        "queryStringParameters": null,
        "rawPath": "/",
        "rawQueryString": "",
        "requestContext": {
            "accountId": "offlineContext_accountId",
            "apiId": "offlineContext_apiId",
            "authorizer": {
                "jwt": {}
            },
            "domainName": "offlineContext_domainName",
            "domainPrefix": "offlineContext_domainPrefix",
            "http": {
                "method": "GET",
                "path": "/",
                "protocol": "HTTP/1.1",
                "sourceIp": "127.0.0.1",
                "userAgent": "PostmanRuntime/7.39.0"
            },
            "requestId": "offlineContext_resourceId",
            "routeKey": "GET /",
            "stage": "$default",
            "time": "13/May/2024:17:05:40 +1000",
            "timeEpoch": 1715583940579
        },
        "routeKey": "GET /",
        "stageVariables": null,
        "version": "2.0"
    }
}
Wrapping up
Thank you for giving it a read, and I hope you find it helpful!